How to Make Kawaii Goal Cloud Stickers (Step-by-Step Tutorial + Free Ideas)
Want to make goal-setting actually fun? These adorable kawaii cloud stickers transform boring resolutions into something you'll actually want to use - and they're made from simple shapes anyone can create!
Quick Navigation:
- What are Kawaii Goal Cloud stickers?
- Why They Work So Well
- Supplies You'll Need
- Step-by-Step Instructions
- Perfect Color Palette Ideas
- 7 Creative Ways to Use Kawaii Goal Cloud Stickers
- Pro Tips
- Common Questions
Let's be honest: most goal trackers feel like homework. Serious. Intimidating. The kind of thing you start with enthusiasm in January and abandon by February.
But what if your goal stickers were so cute you genuinely looked forward to using them?
That's exactly what kawaii goal cloud stickers do. They're soft, encouraging, and smile back at you from your planner page - making even the most mundane goals (yes, even "drink 8 glasses of water") feel joyful.
The best part? You don't need to be an artist or designer to make these. If you can arrange circles and rectangles, you can create professional-looking kawaii stickers that work for your New Year resolutions, kids' chore charts, fitness goals, or daily habit tracking.
In this post, I'll walk you through exactly how to design kawaii goal cloud stickers from scratch using free design software, plus share creative ways to use them all year long.
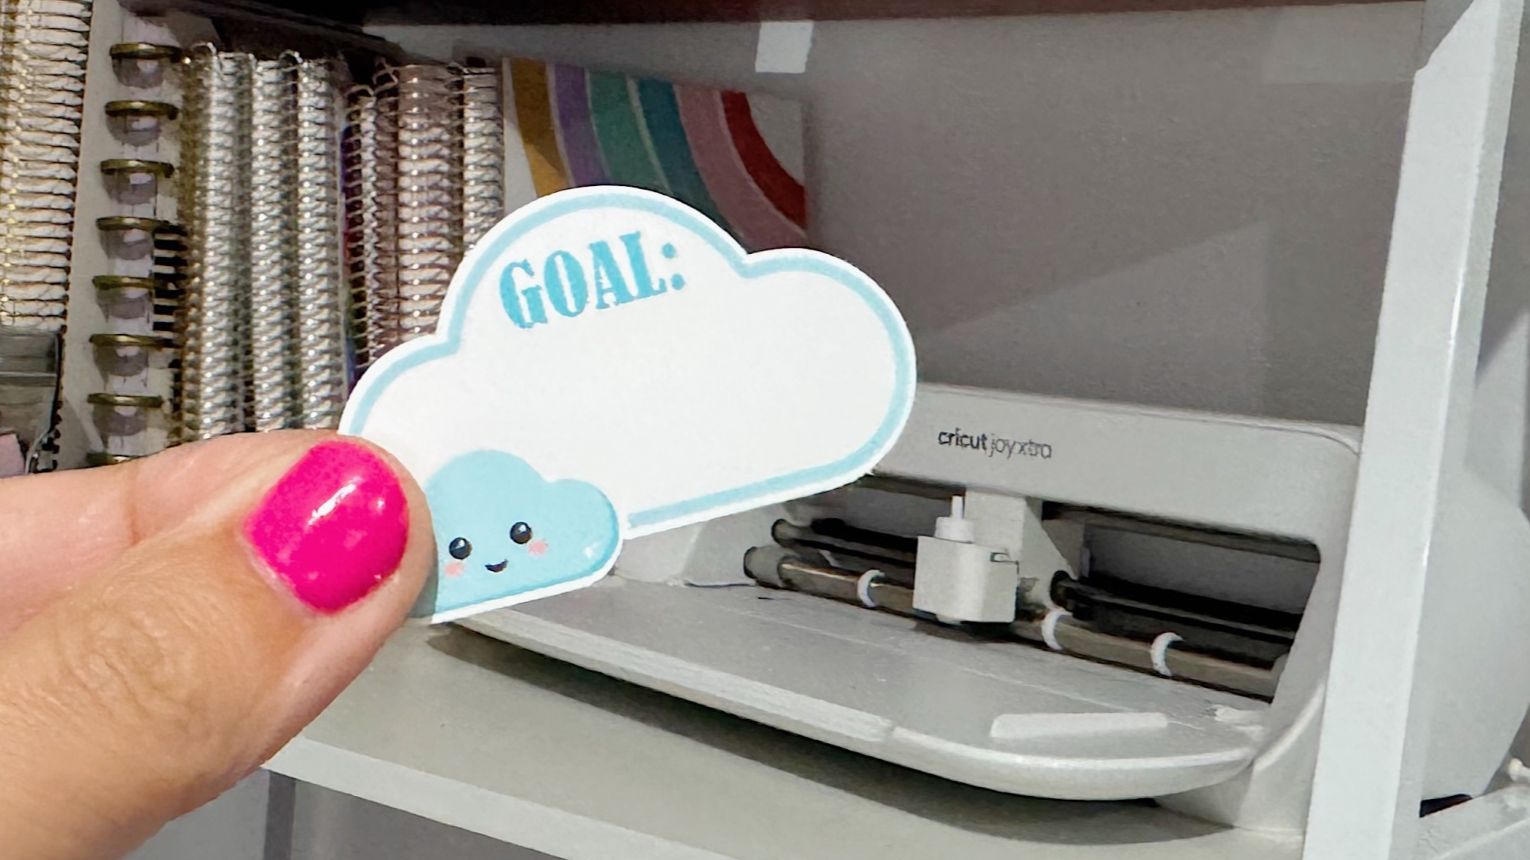
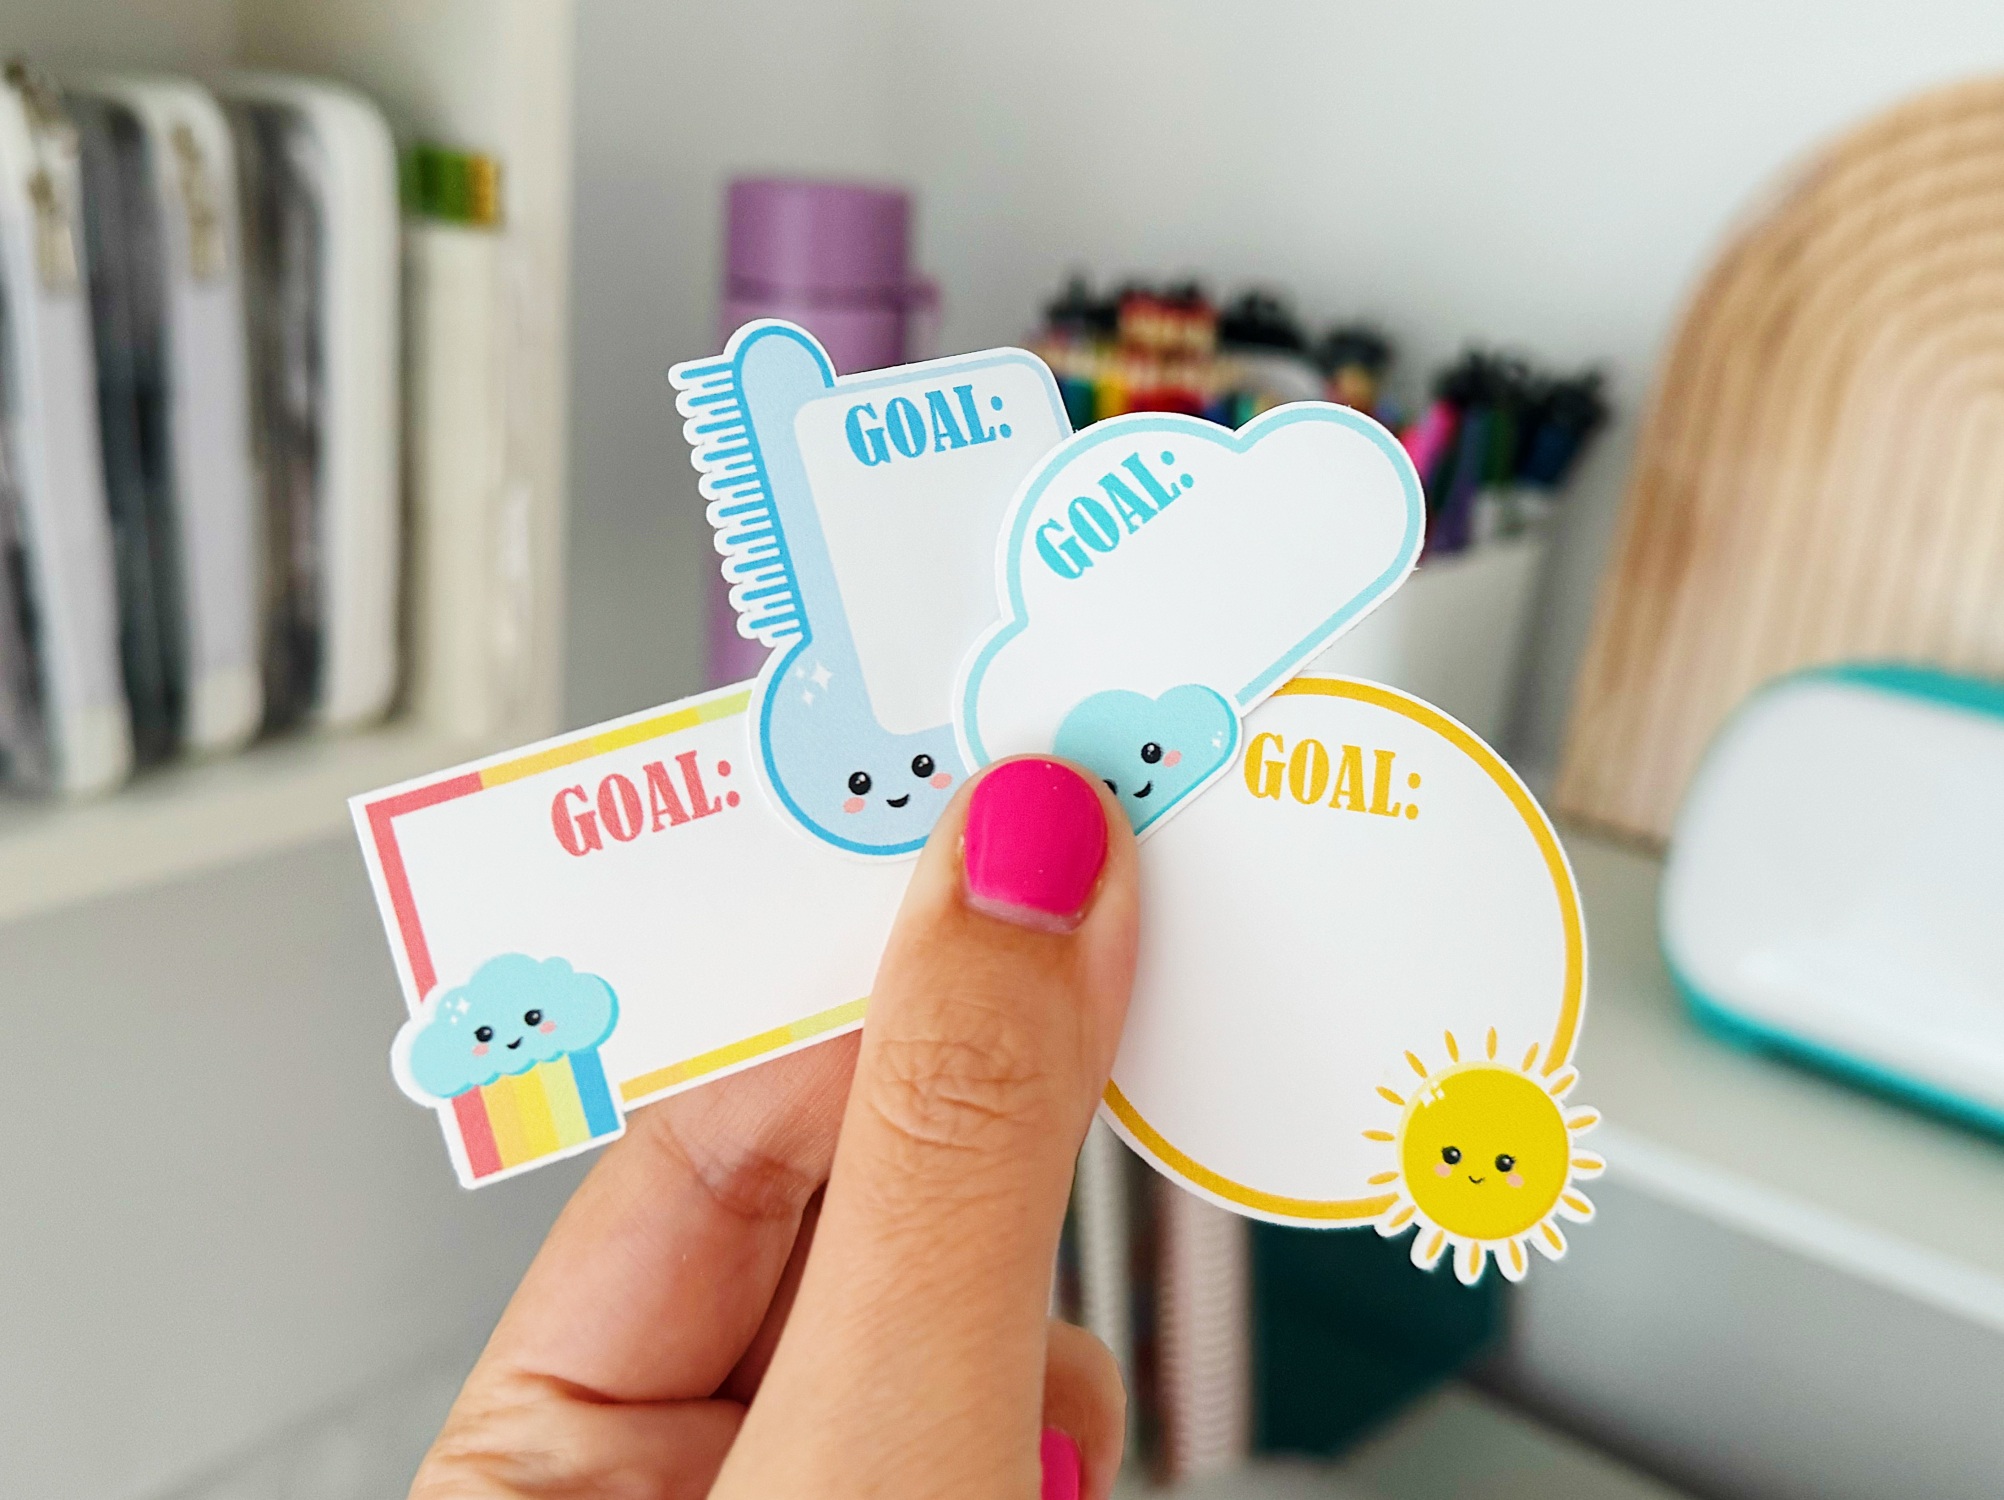
What Are Kawaii Goal Cloud Stickers?
Kawaii goal cloud stickers are adorable, cloud-shaped stickers designed to help you track goals, habits, and intentions in a fun, encouraging way. The word "kawaii" comes from Japanese culture and means "cute" - and these stickers definitely live up to that name.
Each sticker features:
- A fluffy cloud shape made from simple circles and rectangles
- A "Goal" header text
- Space to write or type your specific goal
- Optional kawaii facial features (like rosy cheeks and a sweet smile)
- Soft, encouraging colors instead of harsh or serious tones
Unlike traditional goal trackers that can feel rigid or overwhelming, kawaii goal clouds have a gentle, playful energy. They work beautifully for:
- New Year resolutions - Track your big intentions without the pressure
- Daily habits - Water intake, steps, reading time, meditation
- Kids' goals - Homework, chores, practice time, behavior goals
- Family activities - Weekly goals for each family member
- Wellness tracking - Fitness, mental health, self-care reminders
- Creative projects - "Finish this quilt," "Use my craft stash," "Try one new technique"
- Spiritual practices - Prayer time, Bible reading, gratitude journaling
The genius of these stickers is that they keep your goals visible and top-of-mind, but in a way that feels supportive rather than judgmental. When your goal tracker has a smiling face, it's a lot harder to feel guilty about progress!
Why Kawaii Goal Cloud Stickers Work So Well
There's actual psychology behind why these cute little clouds are more effective than traditional goal trackers:
1. They reduce goal anxiety
Traditional goal tracking can trigger stress and perfectionism. Kawaii designs create a sense of playfulness and safety - your brain doesn't go into "performance pressure" mode when looking at something soft and cute.
2. Visual cues increase follow-through
Seeing your goal written on a cheerful cloud acts as a gentle reminder throughout your day. The cute factor makes you want to look at it, which reinforces the behavior.
3. They work for all ages
Kids love the kawaii style naturally, but adults appreciate it too - it taps into that part of us that responds to warmth and encouragement rather than rigid discipline.
4. The cloud shape feels forgiving
Clouds are soft, floating, and flexible. Psychologically, this creates a feeling of spaciousness around your goals - like there's room to grow and adjust rather than succeed-or-fail pressure.
5. Customization increases commitment
When you make your own goal stickers with your own colors and words, you're more invested in the process. These aren't generic stickers from a store - they're yours.
Supplies You'll Need to Make Kawaii Goal Cloud Stickers
The beauty of these stickers is that you probably already have most of what you need! Here's your complete supply list:
Essential Supplies:
1. Computer or laptop Any standard computer works - Mac or PC. (Note: Chromebooks have limitations with Cricut and Silhouette software, so a traditional computer is recommended.)
2. Design software (free options available) Choose one:
- Cricut Design Space - Free to download, works with Cricut machines
- Silhouette Studio - Free basic version available, works with Silhouette machines and ScanNCut - or if you do not have a cutting machine
- Canva - Free version works great for designing stickers to print
3. Printer Any regular color inkjet or laser printer will work. No special equipment needed!
4. White sticker paper Available at craft stores or online. Start with matte white sticker paper for easiest cutting. Standard letter size (8.5" x 11" or A4) works perfectly.
5. Cutting method Choose one:
- Cricut Xtra, Maker, or Explore (not the original Joy - it doesn't have print-then-cut)
- Silhouette Portrait or Cameo
- Brother ScanNCut
- Scissors or craft knife (if you don't have a cutting machine)
Optional but Helpful:
- Cricut Access subscription - Gives you access to more fonts and design elements
- Laminating sheets - To make waterproof stickers for water bottles or outdoor use
- Weeding tool - Helps lift stickers off the backing paper cleanly
- Craft mat - Protects your work surface during cutting
The total investment to get started is minimal if you already own a printer and cutting machine. If you're buying sticker paper for the first time, a 10-sheet pack typically costs $8-12 and will make dozens of stickers.
How to Design Kawaii Goal Cloud Stickers: Step-by-Step
Now let's create your kawaii goal cloud! I'll walk you through the process using simple shapes - no artistic skills required.
Part 1: Create the Cloud Base Shape
Step 1: Create the Cloud
- Create three separate circles in your design software
- Make one circle larger than the other two (this will be your middle circle)
- Make the other two circles the same size
- Position the three circles into the cloud layout
- Align them to the bottom and distribute them evenly horizontally
Step 2: Add the rectangle base
- Insert a square and resize it into a rectangle
- Make it wide enough to bridge the bottom of your left circle to your right circle
Step 3: Unite the shapes
- Select all shapes (three circles + rectangle)
- Choose "Unite" or "Weld" to merge everything into one cloud shape
Congratulations! You've just created a professional-looking cloud from basic shapes. This is your base that you'll build on.
Part 2: Add Depth with Layering
A simple offset creates that signature layered kawaii look:
Step 1: Create an internal offset
- With your cloud shape selected, use the offset tool to create an offset of -0.1 inches (this creates an inner line)
- Set this offset layer to white
Step 2: Adjust colors
- Set your main cloud to your chosen color (try one of the teals or pink from the palette below)
- The white offset creates a subtle outline effect that makes your cloud pop
This layered effect is what transforms a basic shape into something that looks professionally designed!
Part 3: Add the "Goal" Text
Step 1: Insert text
- Use your software's text tool to add the word "Goal"
- Choose a fun, chunky font that matches the playful kawaii style
Font recommendations:
- Cricut users: Try "Agent Q"
- Silhouette users: Try "Bernard MT Condensed" or "Cooper Black"
- Canva users: Try "Fredoka One"
Step 2: Style your text
- Make it large enough to read clearly
- Choose a contrasting color (black or darker teal works great)
- Consider adding a white offset behind the text to make it pop
Step 3: Position the text
- Place "Goal" near the top of your cloud
- Center it horizontally
Part 4: Add a Writing Line (Optional)
If you want to handwrite your goals on each sticker:
Step 1: Create a line
- Insert a square and resize it into a thin horizontal line
- Make it about 1-1.5 inches wide and 0.05 inches tall
Step 2: Position and color
- Place the line in the lower half of your cloud
- Make it a subtle gray or light color
Step 3: Align everything
- Select all elements (cloud, text, line)
- Center them horizontally
- Adjust vertical spacing so everything looks balanced
Part 5: Create the Kawaii Face
Want to add that extra cute factor? Here's how to create simple kawaii facial features:
For rosy cheeks:
- Create two small circles
- Fill them with a soft pink color
- Position one on each side of the cloud
For closed, happy eyes:
- Create two small curved lines or tiny arcs
- Position them above the center of your cloud
For a smile:
- Draw a simple curved line or use a small arc shape
- Center it below the eyes
Pro tip: Keep facial features minimal and simple. In kawaii design, less is more - tiny details are what create that adorable look.
Perfect Color Palette for Your Kawaii Goal Clouds
Color choice makes a huge difference in how encouraging your goal stickers feel! Here's a tested palette that works beautifully:
Recommended Color Palette:
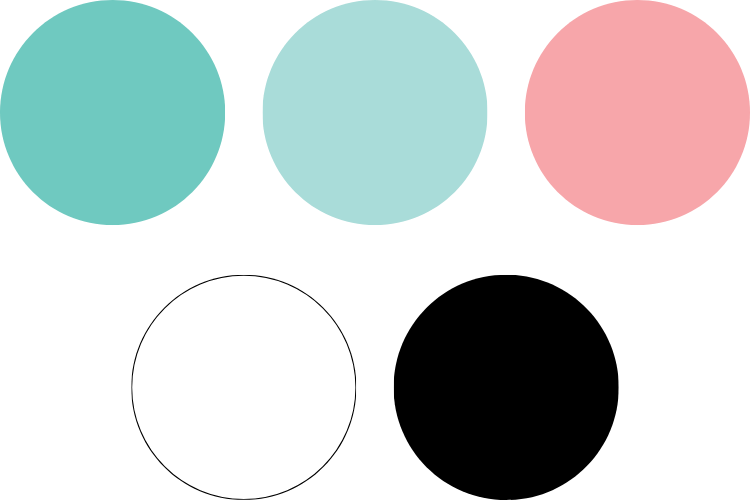
- Mid Teal: #6FC9C0 - Main cloud or outline color, calming and fresh
- Light Teal: #A9DCD9 - Perfect for lighter variations or shadows
- Pink: #F7A6AA - Great for rosy cheeks or feminine goals
- White: #FFFFFF - For offsets and highlights
- Black: #000000 - For text and fine details
Why This Palette Works:
Teal is psychologically associated with clarity, renewal, and healing - perfect for goal-setting. It's also gender-neutral, making these stickers work for the whole family.
Soft pink adds warmth without being too sweet or juvenile. It works for kids' stickers but doesn't alienate adults.
High contrast between the teal clouds and black text ensures your goals are easily readable.
Color Variation Ideas:
Feel free to customize! Try these alternative palettes:
Pastel Rainbow:
- Lavender:
#E1BEE7 #FFF9C4#B4E7F5#C8E6C9
Warm & Cozy:
- Peach:
#FFCCBC - Coral:
#FFAB91 - Cream:
#FFF8E1
Cool & Calm:
- Periwinkle:
#C5CAE9 - Seafoam:
#B2DFDB - Pale Blue:
#BBDEFB
The beauty of making your own stickers is that you can match them perfectly to your planner, journal, or home décor!
7 Creative Ways to Use Your Kawaii Goal Cloud Stickers
Once you've designed your adorable clouds, the possibilities are endless! Here are my favorite ways to use these versatile stickers:
1. Family Goal Board
Create a kitchen whiteboard or poster with one goal cloud per family member. Each person writes their weekly goal, and at the end of the week, you celebrate together. This works beautifully for:
- Kids' homework goals
- Parents' work projects
- Family activity goals ("Have one game night this week")
- Pet care responsibilities
Pro tip: Make each family member's cloud a different color so they're easy to identify at a glance.
2. Daily Habit Tracker in Your Planner
Use small goal clouds to track daily habits that build over time:
- 💧 "Drink 8 glasses"
- 📖 "Read 20 minutes"
- 🧘 "10-minute meditation"
- 🙏 "Morning prayer time"
- 🚶 "Take 8,000 steps"
Place them in your weekly spread and check them off or color them in as you complete each habit.
3. Weekly Star Goals for Kids
Create a reward chart where kids earn a star sticker on their goal cloud each day they complete their task. Five stars = reward! Perfect for:
- Practicing an instrument
- Completing homework without reminding
- Being kind to siblings
- Brushing teeth twice daily
- Putting away toys
Why this works: Kids respond to visual progress, and the kawaii style makes the chart feel fun rather than punitive.
4. Monthly Focus Goal in Your Journal
Dedicate one goal cloud to your monthly "big rock" - the one goal you want to prioritize above all others. Place it:
- On your monthly calendar page
- In your Bible study journal
- On your vision board
- At the front of your project planner
Having that one key goal smile at you every time you open your journal keeps it top of mind.
5. Health & Wellness Fridge Goals
Put goal clouds on your refrigerator for health-related intentions:
- "Walk after dinner"
- "Meal prep Sundays"
- "Drink green smoothie"
- "8 hours sleep"
- "No snacking after 8pm"
Seeing them every time you open the fridge creates gentle accountability without judgment.
6. Craft Room or Creative Studio Goals
Use goal clouds to keep your creative projects on track:
- "Finish this quilt"
- "Use stash fabrics"
- "Try one new technique"
- "Create for 30 minutes daily"
- "Finish UFOs before starting new projects"
These work great in a craft room or art studio where they inspire you during creative time.
7. Gratitude or Daily Win Clouds
Flip the script and use goal clouds for positive reflection:
- "Today's win"
- "What I'm grateful for"
- "Something that made me smile"
- "A moment of peace"
Write one thing each day and watch your collection of wins grow. This practice builds resilience and positive mindset habits.
Pro Tips for Making Goal Cloud Stickers Even Better
Keep a Master Template
Once you've designed your perfect cloud, save it as a master template. Then:
- Duplicate it to create multiples
- Just change the text for each new goal
- Create a whole sheet of personalized clouds in minutes
This saves massive amounts of time if you want to make weekly or monthly sticker sheets.
Create Size Variations
Make goal clouds in three sizes:
- Large (2-3 inches): For vision boards or wall calendars
- Medium (1.5 inches): Perfect for planner pages
- Small (0.75-1 inch): Great for daily trackers or small journals
Having multiple sizes on hand means you always have the right fit.
Print Multiple Copies
Once you have a design you love, print several sheets at once. Store the extra sheets in a sheet protector or folder. This way you have stickers ready to cut whenever you need them - no reprinting required!
Add Lamination for Durability
If you're using goal clouds on:
- Water bottles
- Whiteboards you'll wipe off
- Kids' reward charts that get handled a lot
Apply a layer of clear lamination before cutting. This makes them waterproof and much more durable.
Experiment with Kiss-Cut vs. Die-Cut
- Kiss-cut: The sticker cuts but stays on the backing sheet - easy to peel and use
- Die-cut: The backing cuts too, creating individual stickers
For goal clouds, kiss-cut usually works best because you can arrange multiple goals on one sheet.
Common Questions About Making Kawaii Goal Cloud Stickers
Do I need artistic skills to make these?
Not at all! These stickers are made entirely from basic shapes (circles, rectangles, and text). If you can use a computer mouse, you can make these. The tutorial breaks down every step into simple, manageable actions.
Which design software is easiest for beginners?
Canva tends to be the most intuitive for complete beginners since it's web-based and has a familiar interface. However, if you own a Cricut or Silhouette machine, learning their software (Design Space or Silhouette Studio) will give you more cutting control.
Can I sell stickers I make with this design?
If you design the stickers yourself following this tutorial, yes! You own the rights to your original designs. However, if you use fonts or clip art, always check the commercial licensing terms for those specific elements.
How long does it take to make a sheet of goal cloud stickers?
Once you've created your master template, you can customize and print a full sheet in about 10-15 minutes.
What if I don't have a cutting machine?
You can absolutely cut these by hand with scissors! The cloud shape is simple enough that hand-cutting works well. For cleaner edges, use small craft scissors or a craft knife with a ruler.
Can I make these stickers with my kids?
Yes! Kids ages 8+ can help design these with supervision. Let them choose colors, pick goals, and even help arrange shapes. It's a great way to teach basic design skills while making goal-setting interactive and fun.
What size should I make my goal clouds?
For planner stickers: 1-1.5 inches wide works perfectly. For reward charts or wall calendars: 2-3 inches gives you more writing space. For small journals or habit trackers: 0.75-1 inch fits nicely.
Take Your Sticker-Making Skills Even Further
Ready to create a whole collection of kawaii goal clouds - or learn to make dozens of other sticker types?
Inside Secret Sticker Society, you'll get:
✅ The complete Kawaii Goal Cloud class in Cricut, Silhouette, and Canva versions
✅ Done-for-you editable templates so you can customize, print, and cut in minutes
✅ Written step-by-step instructions you can follow at your own pace
✅ A supportive community of crafters who celebrate your creative wins
✅ New monthly projects to keep you inspired all year long
✅ Commercial license included - sell what you make!
Join Secret Sticker Society for $27/month →
Start Making Goal Stickers That Make You Smile
Goal-setting doesn't have to feel serious, overwhelming, or like one more thing on your to-do list. When you create kawaii goal cloud stickers, you're building a tool that genuinely makes you want to track your progress.
These adorable little clouds work because they combine visual accountability with encouragement - they're cheering you on, not judging you.
Whether you're tracking New Year resolutions, helping your kids build better habits, organizing your creative projects, or simply trying to drink more water, these stickers transform the mundane into something delightful.
The best part? You can make an entire sheet of personalized goal clouds in less time than it takes to scroll through social media. Simple shapes, soft colors, and a few minutes of your time create something you'll actually use - and maybe even look forward to.
So grab your computer, your favorite colors, and let's make goal-setting fun. Your future self (and your smiling kawaii clouds) will thank you!
Have you made kawaii goal cloud stickers? Share your creations with me on Instagram @mimjenkinson - I'd love to see what goals you're setting and what colors you chose! Use #StickWithMim so I can find and celebrate your sticker-making wins.
JOIN THE COMMUNITY:
Learn to make stickers from scratch that you're proud to use a share!